I have been wanting to write this post for a LONG time now. We decided on venturing into Hydroponic Growing almost a year ago and just now were able to make it happen. First, we needed to save some funds to purchase the Hydro unit. The hubs experimented with a few build your own ideas but none seemed to live up to the potential of our chosen unit, the Omega Gardens Volksgarden. The Volksgarden outshines its competition in almost every aspect; it is built durably to last, fully automated and easy to operate, produces strong rapid results in almost 1/3rd of the time, and provides clean, local, year round produce.
Being a large investment we needed to make sure this was a priority and something we really felt passionately about, which it was and we were. After procuring the funds and purchasing the unit, we needed a home to set it up in. Then the waiting game to finish the new house ensued. FINALLY! We were able to start our seedlings and build the unit.
First, we had to choose plants that not only would perform well hydroponically, but that our family would enjoy eating.
We decided on bush beans, cherry tomatoes, yellow pear tomatoes, Russian kale, red lettuce and arugula.
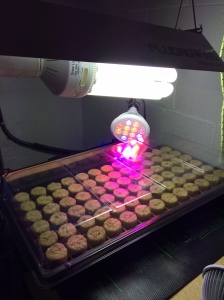
Next, we had to pick a seed starting method. We chose to start the seeds in a round rockwool plug that would then be inserted directly into the square rockwool block. We purchased a starting tray, somewhat like this, to start the seedlings in. Light and humidity are important for fast germination. We have one large florescent and two smaller blue/red lights currently on ours. Along with the lights, we set up a heat mat with temperature control to keep a constant 75 degrees.
Besides water, plants need nutrients to grow. We went with a three part Flora type. Because of the process involved in extracting the nutrients, these products cannot be labeled “organic.” However, we are willing to look beyond the label and read up on the process and feel safe knowing we are feeding our family a safe, nontoxic product.
The rockwool needs to be soaked in the nutrient solution before your can plant the seeds.
After soaking in a 5 gallon bucket for 1-24 hours, you can lightly shake off 10 percent of the liquid from the rockwool and place in the tray. We used a small pipette tool to create a 5mm deep hole for the seeds to rest. Using tweezers, we placed 2-3 seeds in each hole and covered slightly to create a cocoon. The Volksgarden holds 80 plants but the tray only 78, so we will have at least 2 empty spots until we purchase another tray.
We then made a home for the seedlings in the basement, under lights.
Depending on the seeds and set up, the seeds will take 12 hours to 1 week to germinate. We did have some bush beans starting to open the first night. Next post, we will discuss the Volksgarden its self.
Have you ever tried to grow produce hydroponically? Or any other alternative growing method?
[Disclosure: Salty Suburban Homestead is a participant in the Amazon Services LLC Associates Program, an affiliate advertising program designed to provide a means for sites to earn advertising fees by advertising and linking to amazon.com. We receive a small commission whenever a product is purchased through these links. Thank you for your support!]


Pingback: Seed Starting in Rockwool Plugs Hydroponically | Salty Suburban Homestead